

Strawberry Rhubarb jam...summer's first bounty...and what you can make with it...maybe Strawberry Rhubarb Crostata...a simple recipe to make after you have processed your Strawberry Rhubarb jam. Find recipe here.
There's nothing like fresh picked rhubarb. I just received my yearly supply of rhubarb from my Sister-in-Law. I always look forward to that phone call that says, "it's ready"! The possibilities for rhubarb are endless...rhubarb cake, pie, bars, crostata, jelly, jam or just eating it with a little sugar on it. Oh how I remember as a child how good that sugared rhubarb was in the summer. It wasn't until I got older that I learned to appreciate the many versatile ways rhubarb could be used. So start chopping that rhubarb up and make some jelly, jam, cakes, pies, bars or whatever. A wonderful treat at a low price...


Don't forget to freeze some for winter. Nothing better than having a summer taste in the winter time. I always freeze some for desserts. I pack 2 cups of chopped rhubarb in plastic bags (because most recipes call for 2 cups of rhubarb), label and freeze up to 6 months. What a wonderful surprise for the family having the taste of summer in those cold winter months.


This recipe is fairly easy. With the prices of everything these days canning some of the bounties of summer is a way to save a little money and enjoy the tastes of summer during those long winter months. They also make great little gifts for friends and family for the holiday season.
I have been canning for almost 50 years. Yikes, when you write 50 years it almost seems impossible that I've been doing it that long. But I love being able to use all those great canned goods for desserts, pies, salad fixings, salsa and a plethora of other great condiments.


.jpg)
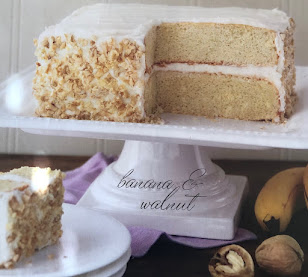
Strawberry Rhubarb Crostata - a great way to use that Strawberry Rhubarb Jam. A quick and easy breakfast delight, or dinner dessert. You can find this recipe here or click on the pictures above to see the recipe.
Time to make Strawberry Rhubarb Jam
.jpg)
Place rhubarb, sugar and water in a large Dutch oven and start cooking. Keep stirring until all the sugar is dissolved.

The picture above shows the rhubarb, sugar and water cooking. After slow boiling it for 10 minutes, add the drained crushed pineapple and cook for another 5 minutes. The pineapple is a little secret ingredient.

The above picture shows what the jam looks like after adding the strawberry Jello. Keep mixing the jello until it has all dissolved.

Now you're ready to fill your canning jars. Using a wide funnel made for canning makes this job a whole lot less messy. It's worth it to purchase the funnel.

After filling jars, wipe the rims of each jar, place lid on top and then place the bands on the jars. Give the band one good twist. Do not over tighten. Now your jam is ready to be processed in the water bath. Make sure the water is slightly boiling before you put the jars in the canner.
Can you freeze the Strawberry Rhubarb Jam?
For those of you that don't want to go through the process of canning, you can always make a batch and put in jelly canning jars and freeze. Make sure you label them. They will last up to 6 months in the freezer.

And here you go...processed, labeled and ready to be stored for those cold winter months or gifts for family and friends. Don't forget to leave one out for yourself. Nothing better than an English muffin with butter and jam!!!
That's it. It sounds a little daunting, but trust me it's very easy. I tasted the jam that was left over in the pan and it was delicious!
Strawberry Rhubarb Jam Recipe


This recipe will make 6 half pint Mason jars
Ingredients:
- 5 C. rhubarb, cut finely (about 1/2" in size)
- 5 C. sugar
- 1 C. water
- 1 20 oz. can of crushed pineapple, drained (secret ingredient)
- 2 3 oz. boxes of strawberry Jello
- 1 tsp. lemon juice ( I add lemon juice. I just think it gives a little kick to the taste.)
***I was able to get 7 pints of jam
Directions:
- Wash rhubarb thoroughly
- Chop rhubarb into 1/2" size pieces
- Add rhubarb, sugar and water to a large Dutch oven or large cooking pot.
- Bring the rhubarb, sugar and water to a boil, stirring constantly. Once it starts boiling set a timer for 10 minutes. I turn my stove down a little, but let it keep on boiling.
- After 10 minutes add the pineapple and keep stirring. After 5 minutes everything should look transparent.
- Turn off heat to pan and immediately and add the 2 boxes of strawberry Jello. Stir until dissolved.
- Place your sterilized jars on a clean towel and start filling the jars with a ladle leaving 1/2" headspace in each jar.
- Clean the tops of the jars with wet paper toweling and place lids on each jar. Place bands on the jars making sure the lid is centered on the jar and twist once to make sure the lid is in place.
- At this point your canner with water should be at a low boil. Place each jar in the canner with a jar lifter. Lower jars into the water bath, cover and set timer for 12-15 minutes.
- Raise canning basket and wipe the lids off. They will have a little water setting the middle that should be wiped clean.
- Place a clean towel on the counter and remove each jar from the canner and place on clean towel. Space the jars about an inch apart, so air can flow around them. At this point the lids should start popping. Not all will pop, but the small button in the middle of the lid should be flat. Run your finger over the top to make sure it is flat and not raised. That ensures the jars are sealed.
Canning 101 . . .
First things first. If you have never canned before you will need a few utensils to invest in, canning jar lifter, water bath canner, mason jars, and a wide mouth funnel. Also you will need a ladle for filling the jars. As you do more and more canning, you might need other tools. But for this recipe you will only need basic tools.


When canning make sure all your produce is washed clean and free of any little pests that might be hiding. Wash thoroughly. For this recipe you will need finely chopped rhubarb, sugar, water, canned crushed pineapple and strawberry Jello. These are all the ingredients you will need to make Strawberry Rhubarb Jam.
Purchase canning jars at the grocery store. Wash them good and then sterilize. I actually put them in the dishwasher and run a complete cycle. Sterilize the bands and lids. (Place on stove in pan with water and boil them. Keep them in water until ready to use.) Make sure they are very clean. When filling jars make sure you leave a 1/2" headspace. After you fill the jars, remove lids and bands with tongs from the the hot water pan and place on clean dish towel. Make sure you wipe the jar rims with a wet paper towel. If there is any food left on the rim, the jar will not seal. Place lid on the jar and place the band over the lid. I twist the rim once to give it a good seal. Don't overtighten. One strong twist does the trick.
While you are preparing the jam, the water bath should be on the stove heating. You need the water bath boiling before you place the jars in the water bath. When it comes to a full boil, turn it down a little bit and place your jars in the water bath. The water bath does not need to be at a full rolling boil when placing your jars in the canner. Like I said before, bring to boil and turn down a bit before you add the jars. Process for 10-15 minutes depending on the recipe. Follow recipe instructions for canning time. Turn off stove and remove jars from water bath using a jar tong. Place the jars on a clean towel on your counter. Wipe any excess water off the lids and wait for the wonderful sound of the lids popping. Your jars are sealed when they pop or the lid is smooth in the middle. Do not move jars from counter for 24 hours. Let them cool and place in your pantry for winter or gifts for friends and family.
Here is a video from youtube that will help the novice with canning.

This video let's you know that canning is safe and fun to do. Come September and October you can process all those wonderful fruits and veggies by canning them. I love making salsa and this is a great way to preserve that wonderful salsa for use at Thanksgiving and Christmas or for just everyday or as gifts.
One Final Thought
I hope the process of canning in this post will help the novice start the process of canning foods. It's been around forever and I'm sure I will be canning forever. A great tool when prices at the grocery store are out of sight...and remember you'll be tasting all these good things this winter and I'm sure it will bring back the smiles of summer! And don't forget, this jam can be frozen also...


Always remember...Life is short, eat dessert first!"...Words to live by!


.jpg)

.jpg)


