

John Deere tractor...a little boy's dream Birthday Cake. It's truly a very easy mini cupcake cake to make. I made this for my Great-Grandson. He is truly obsessed with tractors...big ones, medium ones, small ones and of course those little tiny ones that fit in their hands so well. I made this a while ago. So I had to kind of recreate the instructions and pictures.
You can use a cake mix if you like, but I made mine from a chocolate cake recipe that I just love. The frosting is my version of buttercream frosting. The cake recipe that I used makes 48 mini cupcakes with a little left over to make a small cake for my husband and myself.
John Deere Hershey Nugget Wrappers- a little addition to the John Deere birthday cake...
Here's a little extra to add to your John Deere Birthday party. I love making Hershey Nugget wrappers. I just finished making these to compliment the John Deere birthday cake. They are a lot of fun to make with the kids and the kids love to give them to their guests as a little "thank you" gift. Just click on the picture or "Read More" button below and you will be redirected to the nugget post.
%2020250517_17001712.jpg)
A little humor from Hoffy. . .
I have to add this, because it's truly funny! I'm getting older and I tend to forget things sometimes. After I baked the 48 cupcakes, I buttered and floured my smallest round cake pan to use up the remaining cake batter. After removing the cupcakes from the oven, I placed the small round cake pan with the cake batter back in the oven. I got a little distracted from what I was doing, and forgot about the cake in the oven. I didn't find out what I had done until the next day when I was getting ready to cook supper. I opened the oven and there was my little cake, half baked. First, I said, 'oh no!" and then I laughed. At some point, I turned the oven off after I made the cupcakes and just simply forgot there was another cake in the oven.
It's so fun getting older...LOL! Needless to say that half-baked cake went into the garbage. So sad for my husband and myself. Always remember to keep your eye on the prize. Don't get distracted when you are making anything...It was funny though!!!😂
Let's Make a John Deere Cake


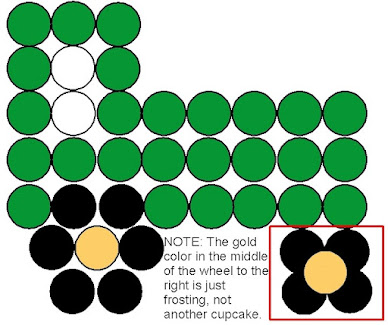
Above is the diagram for the cupcake cake. You will need 39 mini cupcakes. I use a poster board from the Dollar Tree for the base. After baking your mini cupcakes, take them and use the diagram for placement. Check the size of the mini cupcake arrangement and measure where you will need to cut the poster board. Remove mini cupcakes and cut poster board to size.
At this point you should be making your frosting. I have included my recipe for buttercream frosting below. You will need 3 colors for the frosting, green, black, gold and some leftover white frosting for the window. I use a 1M decorating tip. I purchased mine at Walmart for $1.50. I purchased 4 of them so you don't have to wash the tip after each color and you can use them over and over again. Consider them as tools that can be used for many other purposes when it comes to cake decorating. A good investment. I also use plastic pastry bags that can also be purchased at Walmart. I believe the price is about $5.00 for 12.


I'm including my cake recipe below for moist Chocolate Cake, just in case you want to be a little more creative. I found this recipe on Pinterest by the Scientifically Sweet website. I love this recipe because it's so moist and so good. Otherwise, just use a cake mix. I believe one cake mix will make 48 mini cupcakes.
Moist Chocolate Cake

Ingredients:
- 1 3/4 C. flour
- 2/3 C. Cocoa powder
- 1 t. baking powder
- 1 tsp. baking soda
- 1 C. granulated sugar
- 1/2 C. packed light brown sugar
- 3/4 t. salt
- 2 large eggs
- 1/2 C. oil (not olive oil)
- 3/4 C. sour cream
- 1 t. pure vanilla
- 1 C. hot coffee
Directions:
- Preheat oven to 350℉. Lightly grease and flour two 8 inch round cake pans and line the base with parchment paper. Of course we are making mini cupcakes, so place 48 mini cupcake liners in a 48 mini cupcake pan...or you can use a 24 mini cupcake pan and bake two batches.
- Sift flour, cocoa, baking powder and baking soda into a large bow. Add both sugars and salt and whisk to blend well, pressing out any lumps of brown sugar.
- Combine eggs, oil, sour cream and vanilla in a medium bowl and whisk to blend well. Pour into the bowl with the dry ingredients and mix with an electric hand mixer on medium-low until blended. It will be thick and somewhat dry. Add the hot coffee gradually in two stages to minimize clumps forming and beat until evenly combined and the batter is smooth.
- Divide batter evenly between the prepared pans and bake for 30-33 minutes until cakes spring back when pressed gently and toothpick inserted into the center comes out clean. Transfer pans to a wire rack and let cool for 15 minutes before inverting onto the rack to cool completely.
Note: For the mini cupcakes, line pan with mini cupcake liners and fill half full. Bake for 10-12 minutes


You will need all-purpose flour, cocoa powder, baking powder, baking soda, granulated sugar, light brown sugar, salt, eggs, oil, sour cream, vanilla and a cup of hot coffee. Again, you can use a cake mix instead of making your own cake. I use a 48 mini cupcake pan which I purchased at Joann Etc. I do make a lot of them and this size works for me. However, I also have the 12 mini cupcake pan which I use occasionally.


Bake the mini cupcakes for 10-12 minutes. Press on top after 10 minutes to see if they bounce back. If not, leave them in for another minute or two. Let cool. I usually put my cakes, cupcakes and mini cupcakes in the freezer for at least an hour and up to 3 months, if I'm not planning on decorating right away. This keeps them moist while you are preparing the frosting.
Buttercream Frosting
Ingredients:
- 1 c. shortening
- 1 c. margarine or butter
- 4-6 C. powdered sugar
- 1 tsp. vanilla (I use clear vanilla to keep the frosting as white as it can be)
- 1/2 tsp. almond extract
- milk (add a little at a time to the consistency that you want)
Directions:
- Beat shortening and margarine/butter until the color is almost white. This will take a few minutes
- Add powdered sugar, vanilla, almond extract and about a scant 1/4 cup milk and beat until blended. Add more milk to get to your consistency. Remember a little milk goes a long way. Add more milk by tablespoons.
Time to Assemble Your Tractor


Assembling the Tractor
Now it's time to assemble your creation on the poster board that you pre-cut. Use the diagram above for placement. I usually put a drop of frosting on the bottom of each mini cupcake on the liner so it stays in place. This makes frosting each of them much easier. At this point I tint the frosting. Take out 3 bowls and put about a cup or so of the frosting in each. Add green gel color to one, black gel color to the next, and gold gel color to the last and mix until the color is even throughout the frosting. The colors will darken as they sit. If you want the colors more vibrant, add more color. You can also purchase the gel at Walmart or Michaels.
NOTE: Fill your pastry bags and using the diagram swirl the frosting on each mini cupcake. The wheel in the front has only 4 mini cupcakes with a swirl of gold frosting in the center of the 4 mini cupcakes.
NOTE II: If you want your frosting a true white, I recommend using a "White" gel color. When making buttercream with butter or margarine, it will have a slight yellow tinge to the frosting, but tastes the best. White gel color helps to get it to the white color you want. You can also use a tiny amount of purple gel color to neutralize the yellow tinge instead of the white gel color. When using the purple color use it very, very sparingly. A little goes a long way. You don't want to end up with light purple frosting. When I mean a very, very little, I mean just a touch of purple on a toothpick. If it's not quite right, add another touch until you reach the color you want. I personally like the white gel color. It works great!
NOTE: When you are frosting your cupcakes in place, the front wheel is 4 mini cupcakes with some gold frosting in the center of the 4 mini cupcakes, not 5 mini cupcakes.
Finishing that John Deere Tractor Cake ...
So the cake is made and frosted. Now we need to do some finishing work. You need to pipe the smoke stack on to the poster board with black frosting. The clouds are just a few dollops of frosting in white. There is one more thing that needs to be made a head of time. You can use whatever you want for the name on the cake (John Deere), if you just want to use some gold frosting and make star dabs, use a star tip (also can be purchased at Walmart). I used homemade fondant for the name plaque (by Fabulous Cakes website) and then piped on the John Deere name. Below is the recipe for homemade fondant. I've used this recipe for years and you will find it in other posts that I have written. I have also added a video on making homemade fondant below.

Homemade Marshmallow Fondant


Ingredients:
- 1 (1 lb. or 454 gm) bag of mini marshmallows (I use the big ones...just remember to weigh them if
- using the big ones.
- 2 T. water
- 5-6 cups of powdered sugar
- 1 tsp. of lemon, orange, almond or vanilla extract (optional)...I use the almond extract
Directions:
- Place the marshmallows in a big bowl.
- Add water.
- Microwave it for a minute. Let it rest in microwave for a minute, then microwave it again for 1 minutes.
- In the meantime grease a wooden spoon with shortening.
- Mix marshmallows until all melted and smooth. Add flavors and color if using. (I just make my fondant white and add the color I need mixing it by kneading the color into the fondant).
- Add 2 cups of powdered sugar and mix.
- Add another 2 cups of powdered sugar and mix again. It will be harder to mix with a spoon at this stage. Use a scraper to get to the bits at the bottom of the bowl. Use your hands to knead the dough. (I grease my hands at this point to keep the dough from sticking to my hands).
- The dough will still be sticky at this point. Add 1 to 2 more cups of powdered sugar. The amount varies depending on how sticky the dough is.
- I mix it in a bowl and then place it on my pie mat to knead. It's totally up to you how you want to do it. Just keep in mind you might need to grease your hands a few times.
- Make it into a ball shape and cover with plastic wrap and place it inside a tight sealed container or baggie. Don't forget to squeeze the air out.
- Note: This fondant can be frozen in an airtight container to be used for other decorations at a later date.
This recipe is enough to cover up to a 12" round cake 4" high. I have never used it on a cake. I use my fondant for making shapes, flowers and other decorations for cakes or cupcakes. Thanks "Make Fabulous Cakes" for a great recipe for fondant...and it's a lot cheaper than buying it pre-made.
At the beginning of this post I said I had to recreate the process for making the tractor because I had made this awhile ago. So I used my mini cupcakes that I made for this post for some Halloween mini cupcakes, because Halloween is just around the corner. We don't want to waste some good mini cupcakes, do we?


And here it is! All finished...there are so many cute cakes that can be made with mini cupcakes. They're easy to make and each mini cupcake is just the right size for adults and children.


One Final Thought . . .
Well, that's it for the John Deere tractor cake. I hope that my instructions are easy enough for everyone to follow. Yes, you do have to invest in a mini cupcake pan, but you will use it over and over again for other cupcake cakes. The piping tips are a very good investment also, along with the pastry bags. I guess the best way to look at it is you will create many, many mini cupcake cakes to put lots of smiles on your family's faces...
Always remember...Life is short, eat dessert first!"...Words to live by!

No comments:
Post a Comment