Club Quesadillas...Breakfast, Lunch and Dinner!

What can be better? Any kind of quesadillas...they're the best! Kids and adults love them equally. Kids like them for lunch or a great after school treat. Who hasn't taken a tortilla, filled it with cheese and nuked it in the microwave. So yummy and takes the edge off when you are really hungry. They are also a great dinner time favorite with soup, or as an appetizer when you have guests. Plus they are a great appetizer when you're out for dinner. They are also great with leftover turkey from Thanksgiving.
In my bowling days I would have one with chicken just about every week with an adult beverage and my  bowling buddies. Nothing better than that! There are so many kinds of quesadillas out there. Club quesadillas are great and I've added a few more at the bottom of this post that might interest everyone.

Let's Make A Club Quesadilla...
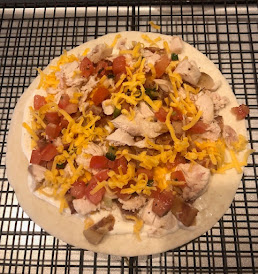
First spread the ranch dressing on the tortilla. Then add some cheese on top of the dressing.
Sprinkle some bacon and chicken on top of the dressing and cheese.
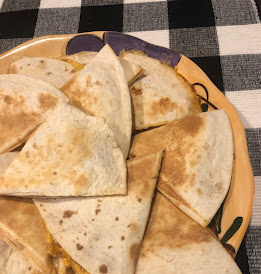
Then sprinkle with tomatoes and place the second tortilla on top of the ingredients. I have a tortilla maker. Plug in so the maker gets hot. Once the green light comes on you're ready to place the first tortilla on the maker. Cook for about 7-8 minutes or until golden brown.
And here they are. I didn't have large tortillas, but the small ones worked also. I placed some more bruschetta on top of the tortillas for extra flavor.

Club Quesadillas Recipe...
Ingredients: 
  • 2 flour tortillas (6 inch)
  • 1 T. Ranch Dressing
  • Chopped chicken or turkey
  • 1 slice bacon, cooked and crumbled
  • 1 tomato (diced) - I used some left over bruschetta that we had had the night before.
  • Shredded Cheddar cheese
  • *Salsa (optional) but what's a quesadilla without the fixings. I also put ranch dressing out and sour cream.
**Note: this recipe is for 1 quesadilla...just double or triple your ingredients for more quesadillas              
Directions:
  1. If you are lucky enough to have a quesadilla maker, follow instructions on how to cook.
  2. Heat grill or non-stick skillet on top of the stove to medium heat. Spread tortillas with ranch dressing.
  3. Layer remaining ingredients on one tortilla. Place second tortilla on top of ingredients and other tortilla.
  4. Grill or heat in frying pan 2 to 3 minutes on each side or until quesadillas are golden brown on both sides and singles (cheese) are melted
How to Cook Quesadillas the Old Fashion Way...on the stove!
You can also make quesadillas the old fashioned way...on the stove. I actually think the quesadillas are much better when cooked on the stove. Below is a youTube video with Nicole McLaughlin from All Recipes. They look delicious! So if you don't have a quesadilla maker, just do it the old fashion way!
Easy Quesadillas by Nicole McLaughlin from All Recipes

One Final Thought...
This is just a quick post on a quick snack or accompaniment to dinner. I love quesadillas. You can do a lot with tortillas. They aren't for just Mexican food. I've added a few different kinds of quesadillas that I think would be great, especially the breakfast quesadilla. What can I say, anything on a tortilla is great. A quick and easy lunch or dinner. And don't we want something easy these days! 

Also check out the Helpful Tips at the bottom of this post. How to Clean windows both inside and out.

   
Cleaning Windows inside and out!
Oh those nasty windows...Every spring it's inevitable we need to clean those nasty windows. I came across this method on the internet. I have to say though, I have always used Dawn for cleaning my windows inside. They are always clean with no residue. But this helpful hint covers the outside windows. I think we have all tried the store bought cleaner. And although it works OK, it just doesn't fit my standard for clean windows. Here's a recipe that will work every time with no rubbing, scrubbing or drying. It cuts the amount of work down to manageable.

Outdoor Window Cleaner Solution:
1/2 gallon warm water
1 T. liquid Jet Dry
1-2 T. Dawn Dishwashing Detergent

Directions:
  1. Mix all ingredients above in a large bucket.
  2. Spray windows down with your hose.
  3. Wipe or brush cleaning solution onto windows, immediately hose off your windows
That's it! You are now done. The remaining water will sheet off, leaving clean streak free windows.

Source:  33 Barefoot Lane

Always remember..."Life's short...eat dessert first!"...words to live by! 

Cherry Cheese Coffee Cake & Cinnamon Apple Cheese Coffee Cake

One of my favorite morning recipes...cream cheese, cherry pie filling or apple pie filling and refrigerated crescent rolls make this one a keeper! A great morning delight for you or if you are having guests for that fun weekend. This Danish comes together very quickly and easily. 

I just finished canning about 100 pounds of apples. I made a lot of apple pie filling. I thought it would be fun to try this recipe with the apple pie filling. It turned out absolutely delicious. Don't limit yourself to just the cherry Danish. You can also use strawberries, blueberries, blackberries or just about any fruit you can think of. Like I said in the first paragraph, this recipe is so easy and is definitely a keeper!

I have included recipes for breakfast treats in this post also...a German pancake, homemade Pop Tarts, breakfast sliders, Cinnamon Roll casserole and Ham and Cheese Omelet for a crowd. These recipes are from contributors from around the internet. I love sharing posts that I think everyone would enjoy. Plus, it gives more exposure to the gals and guys that work so hard to make their posts pop.

If you are looking for some great breakfast recipes, I think you will enjoy reading all the recipes in this post. They are fantastic!

Let's Assemble this Yummy Breakfast Treat...
You will need two refrigerated crescent rolls in the dairy section of your grocery store. Open both rolls and set aside 4 of the triangled crescent rolls. Grab your baking stone and starting at 12 o'clock, place one of the triangles at 12, 3, 6  and 9. Place 2 triangles in between each of the other 4 triangles located at 12, 3, 6 and 9. Start pinching the seams together all the way around. Tuck the short ends in the middle by making a 3" opening in the center. Pinch the crescent rolls all the way around.

Next make the cream cheese layer and then put the mixture on top of the crescent rolls.
Next add your fruit of choice on top of the cream cheese mixture. Then take the remaining 4 triangle crescent rolls and divide each into 3 pieces. You should have 12 skinny triangles when done. Arrange the 12 skinny triangles just like you did the other triangles. Lay them on the fruit mixture. Tuck the skinny ends in the middle of the Danish and pinch in place. Also do this with the wider ends. Just pinch them in place to the crescent rolls on the bottom.
Bake in a 350 degree oven for about 25 minutes. Allow the Danish to cool and then add a glaze consisting of powdered sugar, vanilla and a little milk. Mix until its a thin consistency that can be dropped from a fork, or a spoon or a small whisk.

This one is delicious and easy. Total time to make it was about 15 minutes, not counting cooking time. It's great when you need something quick in the morning or on weekends. I've had both the apple Danish and the cherry Danish. I can't decide which one is my favorite!

Cherry & Apple Cream Cheese Danish...
Ingredients:
  • 2 (8 oz.) pkgs. refrigerated crescent rolls
  • 8 oz. cream cheese
  • 1/4 c. powdered sugar
  • 1 egg
  • 1/2 tsp. vanilla or almond extract
  • 21 oz. can cherry pie filling or any pie filling of your choice
Glaze:
  • 1/2 c. powdered sugar
  • 2-3 tsps. milk
  • (I add a 1/2 tsp. of almond extract)
Directions:
  1. Preheat oven to 350 degrees F. Unroll crescent dough and arrange 12 of the triangles in a circle with wide ends toward the outside edge of a large round pizza stone.  
  2. The points will not meet in the center.  
  3. Lightly flour and roll out the seams making a 14" circle with a 3" hole in the center.
  4. Combine the cream cheese, powdered sugar, egg and vanilla and spread over dough.
  5. Top with pie filling
  6. Cut each of the four remaining triangles into thirds (starting at the wide end opposite the point and cutting lengthwise to the point).
  7. Arrange over filling evenly in spoke-like pattern.
  8. Press ends to seal at center and outer edges.
  9. Bake 25-30 minutes or until golden brown. Cool slightly.
Glaze: Mix powdered sugar and milk until glaze consistency and drizzle over coffee cake.

One Final Thought...
So many great breakfast ideas and hopefully enough time to make and enjoy them! Those breakfast sliders will work really great at the lake this summer.


Always remember..."Life's short...eat dessert first!"...words to live by!